Migrate from Postman to Postmate Client
Already have Postman collections, environments, and CSV test data you depend on? Postmate Client imports all three directly inside VS Code — no rebuilding from scratch, no copy-pasting requests. Your entire collection, folder structure, scripts, tests, environment variables, and data-driven test inputs are ready in seconds.
This guide walks through the complete migration: exporting from Postman, importing collections, importing environments, importing CSV test data, and updating the few scripting API calls that differ between the two tools.
What you can migrate
Postmate Client supports importing all three major Postman exports:
- Postman collections (
.json, Collection v2.1) — including folders, requests, headers, body, auth, and pre/post-request scripts - Postman environments (
.json) — variables with their values and types - Postman test data (
.csv) — any CSV file you use for data-driven testing in Postman's collection runner
All three formats are imported through dedicated menu options in the Postmate Client sidebar.
Prerequisites
- Postmate Client installed in VS Code
- Your Postman collection exported as a
.jsonfile (Collection v2.1 format) - (Optional) Your Postman environment exported as a
.jsonfile - (Optional) Your
.csvtest data file from Postman's collection runner
Part 1 — Import a Postman collection
Step 1: Export the collection from Postman
- In Postman, right-click the collection in the sidebar.
- Select Export.
- Choose Collection v2.1 format.
- Save the
.jsonfile somewhere accessible on your machine.
TIP
Export your Postman environments and CSV test data files separately too — Postmate Client supports importing each independently (covered in Parts 2 and 3 below).
Step 2: Open the collection import menu
In the Postmate Client sidebar, on the Collections tab, click the hamburger menu icon (⋮ / ≡) at the top right of the collections panel.
Select Import Postman/Postmate from the dropdown.
 The Collections hamburger menu in Postmate Client — choose "Import Postman/Postmate" to begin migration.
The full menu includes:
- New Collection — create a fresh empty collection
- Export Project — export your entire Postmate Client workspace
- Import Project — import a previously-exported workspace
- Import Swagger — import an OpenAPI/Swagger spec
- Import Postman/Postmate ← select this for Postman or Postmate Client collections
Step 3: Choose the collection type
Postmate Client supports both its own native format and Postman's v2.1 format. When prompted, select Postman as the collection type.
 Select "Postman" as the collection type — Postmate Client supports both its own native format and Postman's.
Step 4: Select the .json file
A file selector opens. Navigate to the .json file you exported from Postman and click Import Postman Collection.
Postmate Client parses the file immediately and imports everything:
- All requests (method, URL, query params, headers, body)
- All folders and the complete collection hierarchy
- All pre-request and post-request scripts
- All tests using
pm.test()andpm.expect()
The collection appears instantly in the Postmate Client sidebar, organized exactly as it was in Postman.
Handling duplicate collection names
If a collection with the same name already exists in Postmate Client, you'll see a confirmation prompt:
⚠️ Collection "school" already exists. Overwrite?
| Choice | Result |
|---|---|
| Yes | Replaces the existing collection with the newly imported one |
| No | Cancels the import, leaving the existing collection untouched |
Part 2 — Import a Postman environment
Postmate Client supports importing Postman environments, so your references keep working without any manual setup.
Step 1: Export the environment from Postman
- In Postman, click the Environments tab in the sidebar.
- Right-click the environment you want to export.
- Select Export — Postman saves a
.jsonfile containing all your environment variables and their values.
Step 2: Open the environment import menu
In the Postmate Client sidebar, switch to the Env tab (next to Collections). Click the hamburger menu icon (⋮ / ≡) at the top right of the environments panel.
Select Import Env from the dropdown.
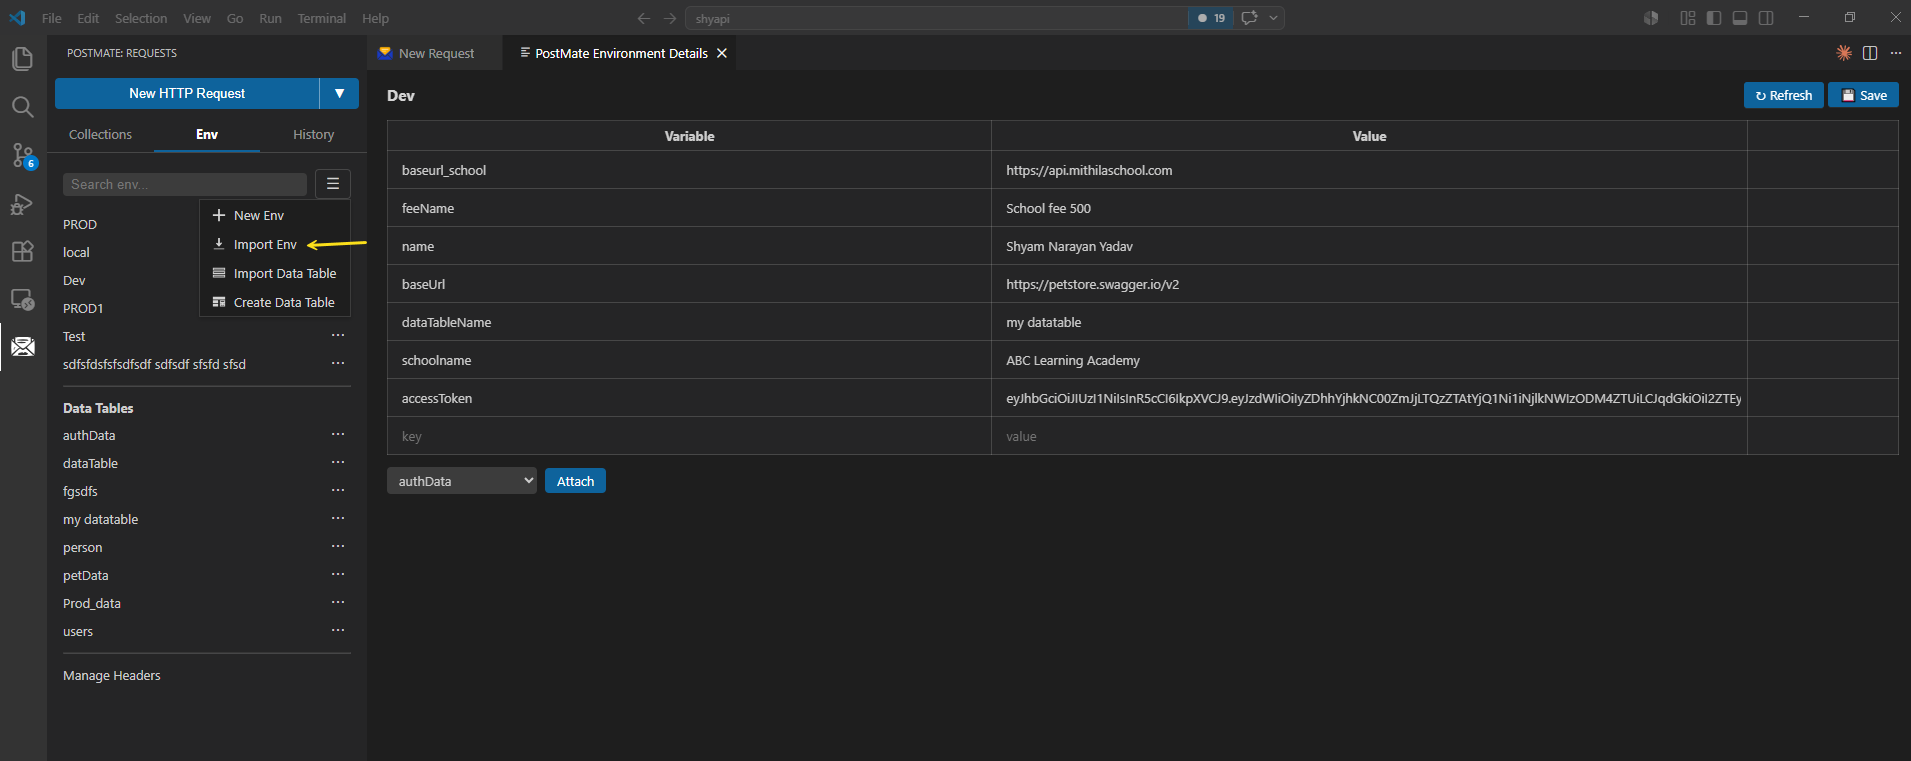 The Env hamburger menu in Postmate Client — choose "Import Env" to import a Postman environment.
The full menu includes:
- New Env — create a new empty environment
- Import Env ← select this for Postman environments
- Import Data Table — import a CSV test data file (covered in Part 3)
- Create Data Table — create a new empty data table from scratch
Step 3: Select the environment .json file
A file selector opens. Navigate to the .json file you exported from Postman and click Import Environment.
The imported environment is immediately listed in the Env sidebar, ready to be selected as the active environment from any request. All variable names, values, and types are preserved.
Part 3 — Import Postman test data (CSV)
If you've been doing data-driven testing in Postman with .csv files passed to the collection runner, Postmate Client imports those files directly too — and once imported, your CSV becomes a first-class Data Table that can be attached to any environment.
This is one of the areas where Postmate Client actually goes further than Postman: data tables can be linked to environments so the same dataset works across dev, staging, and prod, and individual rows can be filtered per request using a _dtag column.
Step 1: Locate your existing Postman CSV file
If you've been using a CSV with Postman's collection runner, you already have the file on your machine — Postman doesn't store CSVs internally, it just reads them at run time. Find the .csv file you've been pointing the runner at.
TIP
The CSV file you used for Postman's collection runner imports directly into Postmate Client with no format changes. Header row in, data rows below — same as Postman expects.
Step 2: Open the data table import menu
In the Postmate Client sidebar, switch to the Env tab. Click the hamburger menu icon (⋮ / ≡) at the top right of the environments panel.
Select Import Data Table from the dropdown.
Step 3: Select the .csv file
A file selector opens. Navigate to the .csv file you used with Postman and click Import.
The imported data table is immediately listed under the Data Tables section of the Env sidebar, ready to be attached to any environment or used directly with collection runs.
What you can now do with your imported CSV
Once imported, your former Postman CSV unlocks Postmate Client features that go beyond Postman's collection runner:
- Attach the data table to an environment so it's automatically active for every request in that environment
- Add a
_dtagcolumn to filter which rows run on which request (unique to Postmate Client — Postman has no equivalent) - Reference any column as
in URLs, headers, body, params, and scripts - Run the data table with the collection runner for full data-driven test runs
See the Data Tables guide and Data Tagging guide for the complete workflow.
API differences: Postman → Postmate Client
Most pm.* API calls are compatible, but a few Postman methods have direct Postmate Client equivalents you'll want to update in your scripts after importing:
| Postman | Postmate Client |
|---|---|
pm.environment.set(k, v) | pm.setVariable(k, v) |
pm.environment.get(k) | pm.getVariable(k) |
pm.environment.unset(k) | pm.clearVariable(k) |
pm.variables.get(k) | pm.getVariable(k) |
pm.response.to.have.status(n) | pm.expect(RESPONSE.status).to.equal(n) |
pm.response.json() | RESPONSE.body |
pm.response.code | RESPONSE.status |
pm.response.responseTime | RESPONSE.responseTime |
pm.response.headers.get(k) | RESPONSE.headers[k] |
console.log() | pm.log() |
Fast migration trick
Run a global find-and-replace on your exported .json file before importing — swap pm.environment.set → pm.setVariable, pm.environment.get → pm.getVariable, and console.log → pm.log in one pass. Saves you from editing each script after import.
What transfers cleanly
- ✅ Request method, URL, headers, query params, body
- ✅ Collection and folder structure (full hierarchy preserved)
- ✅ Authorization headers and tokens
- ✅ Pre/post-request scripts (with the API updates above)
- ✅ Tests using
pm.test()andpm.expect() - ✅ Environment variables (imported separately as shown in Part 2)
- ✅ CSV test data files (imported as Data Tables as shown in Part 3)
What needs manual review
- ⚠️
pm.environment.*calls — update topm.setVariable/pm.getVariable/pm.clearVariable - ⚠️
pm.response.*calls — update toRESPONSE.* - ⚠️
console.log()— update topm.log() - ⚠️ Postman-specific monitors, mocks, and cloud features — Postmate Client is local-only and doesn't run cloud services
Quick reference
| Step | What to do |
|---|---|
| 1 | Export your collection from Postman as Collection v2.1 .json |
| 2 | (Optional) Export your Postman environment as .json |
| 3 | (Optional) Locate any .csv test data file you use with Postman's collection runner |
| 4 | In Postmate Client, open the Collections hamburger menu → Import Postman/Postmate |
| 5 | Select Postman as the collection type |
| 6 | Browse to your .json file and confirm the import |
| 7 | If prompted about duplicates, choose Yes to overwrite or No to cancel |
| 8 | (Optional) Open the Env hamburger menu → Import Env to bring across your Postman environment |
| 9 | (Optional) Open the Env hamburger menu → Import Data Table to bring across your CSV test data |
| 10 | Run a find-and-replace for pm.environment.* → pm.setVariable / pm.getVariable in scripts |
Frequently asked questions
Can I import a Postman collection into Postmate Client without losing my folder structure?
Yes. Postmate Client preserves the complete collection hierarchy from your Postman export — all folders, sub-folders, and requests appear in the Postmate Client sidebar exactly as they were organized in Postman.
What Postman collection format should I export for Postmate Client?
Export as Collection v2.1 from Postman. This is the most widely-supported Postman format and what Postmate Client expects when importing.
Can I import Postman environments into Postmate Client?
Yes. Export your Postman environment as .json, then in Postmate Client open the Env tab → hamburger menu → Import Env. All variables, values, and types are preserved. See Part 2 above for the full walkthrough.
Can I import my Postman CSV test data?
Yes. The .csv files you use with Postman's collection runner import directly into Postmate Client as Data Tables. Open the Env tab → hamburger menu → Import Data Table and select your CSV. No format changes are needed — the same file works in both tools. See Part 3 above for the full walkthrough.
What happens if a collection with the same name already exists?
Postmate Client detects the conflict and shows a confirmation dialog asking if you want to overwrite the existing collection. Choose Yes to replace it or No to cancel and keep the original.
Do I need to update my Postman scripts after importing?
Scripts using pm.environment.set(), pm.environment.get(), pm.response.*, and console.log() need to be updated to their Postmate Client equivalents (pm.setVariable, pm.getVariable, RESPONSE.*, pm.log). The fastest approach is a global find-and-replace in the exported .json file before importing — see the migration table above for the full mapping.
Can I also import Postmate Client's own native collections?
Yes. In Step 3 of Part 1, select Postmate instead of Postman to import a native Postmate Client collection file (typically used when migrating between workspaces or sharing collections with teammates).
Is Postmate Client a free alternative to Postman?
Yes. Postmate Client is free forever — no paid tiers, no team seats, no login required. It runs entirely inside VS Code with no cloud sync and no telemetry. Install directly from the VS Code Marketplace.
Will my collection sync to the cloud after importing?
No. Postmate Client is local-first by design — your imported collections, environments, CSV files, and credentials never leave your machine. There is no cloud sync and no telemetry. This is also one of the main reasons developers switch from Postman.