WebSocket Testing in VS Code
Postmate Client is a free WebSocket client built natively into VS Code. Connect to any ws:// or wss:// endpoint, send messages, watch responses stream in real time, and save WebSocket requests to your collections alongside REST and GraphQL — all without leaving the editor, and without a paid tier.
If you've been using Postman or paying for Thunder Client just to test WebSocket connections, this is a free, local-first alternative that runs entirely inside VS Code.
Why test WebSockets in VS Code?
Most VS Code REST extensions stop at HTTP. Postman supports WebSocket only in its desktop app, behind a login. Thunder Client supports WebSocket only in its paid tier. Postmate Client supports WebSocket for free, in the same editor you write code in, with no cloud sync and no telemetry. Connections stay on your machine.
Open a new WebSocket request
Click the dropdown arrow next to the New HTTP Request button in the Postmate Client sidebar, then choose WebSocket from the menu.
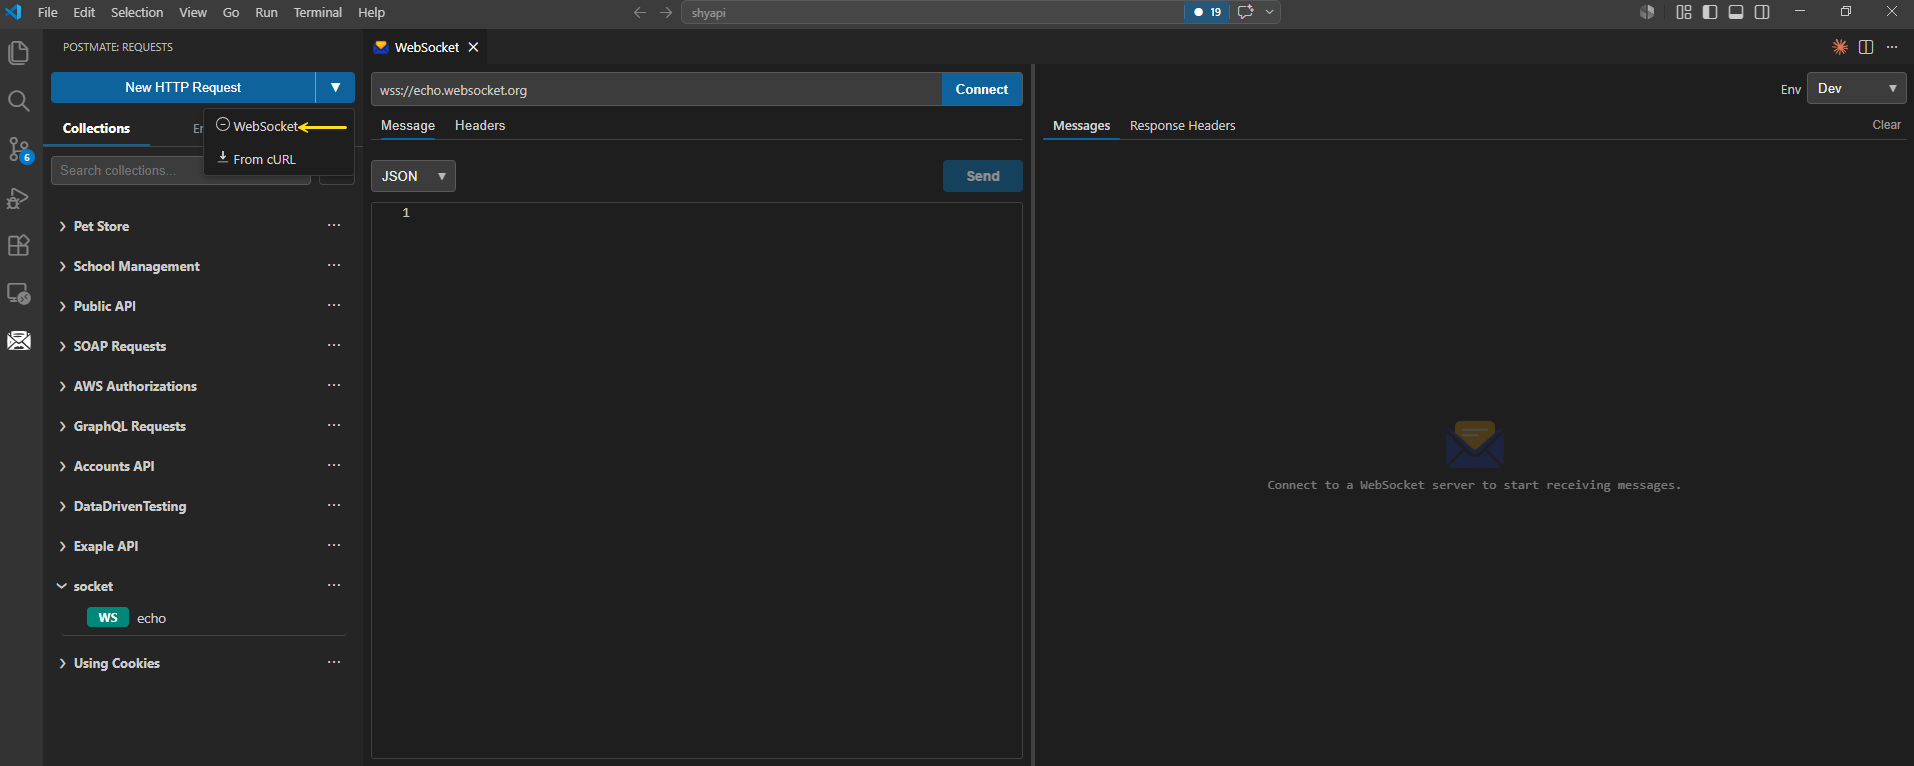
A new WebSocket panel opens in the editor with a URL bar, Message and Headers tabs, a Connect button, and a response panel on the right.
Connect to a WebSocket server
- Enter the WebSocket URL (e.g.
wss://echo.websocket.org) in the URL bar at the top of the panel. - If your server requires authentication or custom headers, open the Headers tab and add them (for example, an
Authorization: Bearer <token>header). - Click Connect.
When the connection succeeds, the Connect button turns into a red Disconnect button, and the response panel shows a system message confirming the connection. Any messages the server sends will start streaming into the response panel automatically.
Authentication
Postmate Client's WebSocket panel uses the Headers tab for authentication. Add an Authorization header, an API key header, or any other custom header your server expects. There is no separate Auth tab for WebSocket today — anything you'd normally configure under "Auth" goes in Headers.
Send and receive messages
While connected, type a message in the editor and click Send. Pick the message format from the dropdown above the editor — TEXT, JSON, XML, or HTML.
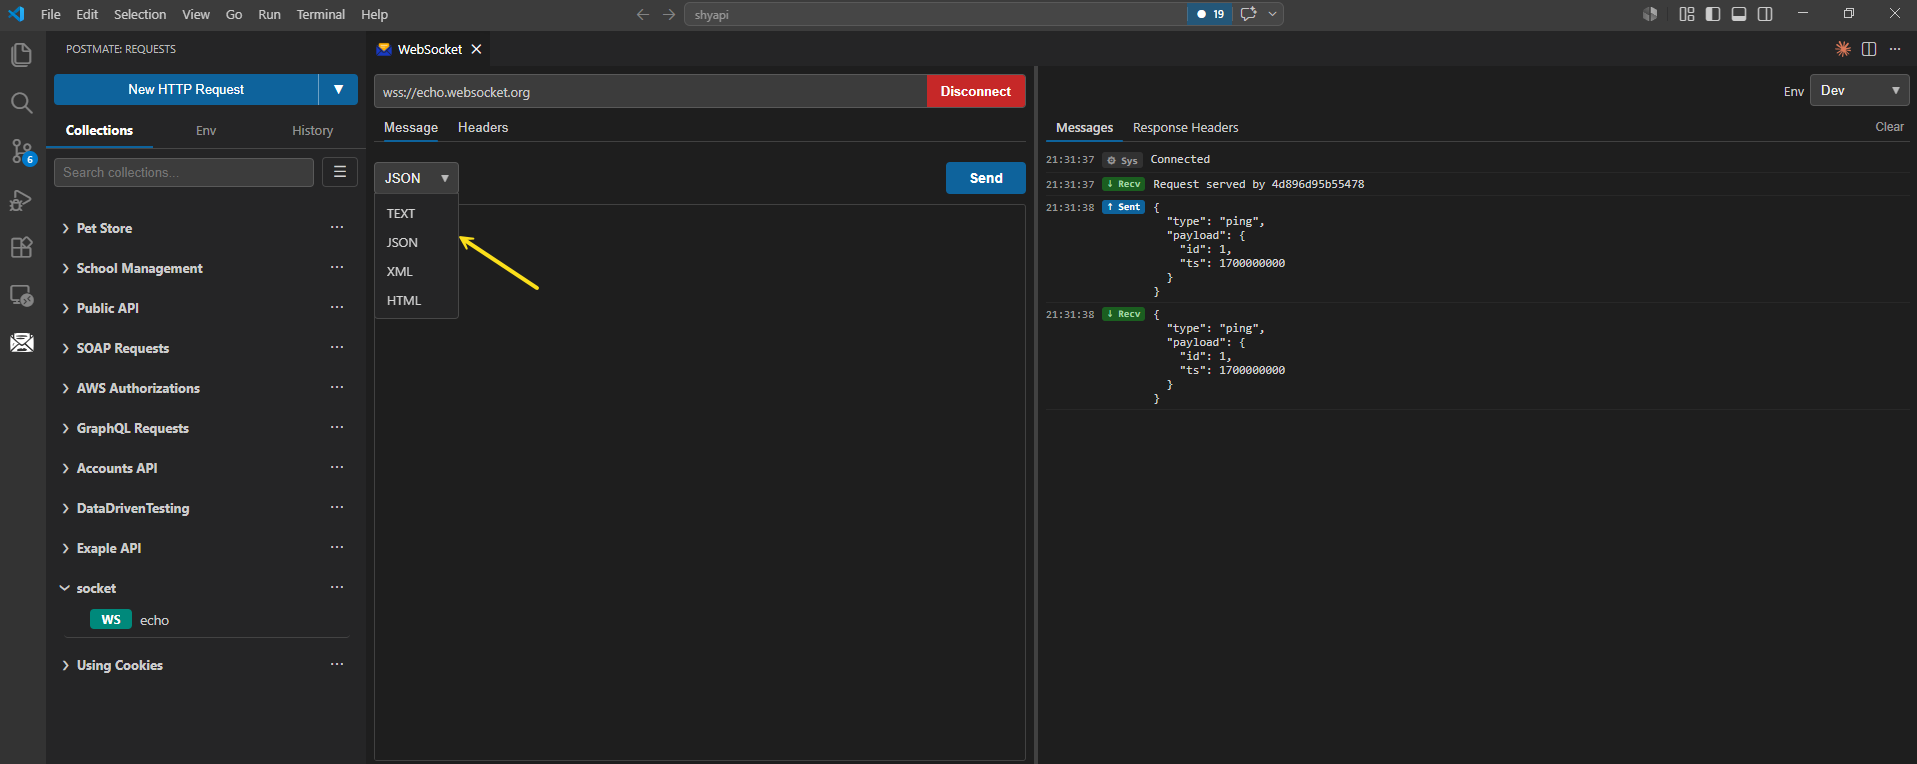
Each format gives you:
- TEXT — Send any free-form string. No validation, no syntax highlighting.
- JSON — Inline syntax validation. Invalid JSON shows an error, but you can still send it — the editor warns you, it doesn't block you.
- XML — Inline XML validation with the same non-blocking behavior.
- HTML — Inline HTML validation with the same non-blocking behavior.
Click Send. Your outgoing message appears in the response panel with a green Sent label, and any reply from the server arrives below it with a Recv label.
The response panel streams every message in real time — there's no buffering, no manual refresh. Whatever the server pushes, you see immediately.
Disconnect
Click the red Disconnect button at any time to close the connection. The button switches back to a blue Connect, ready to reconnect.
Reconnection is manual
Postmate Client does not auto-reconnect dropped WebSocket connections. If the server closes the connection (or your network drops), click Connect again to reopen it. This is intentional — auto-reconnect can hide real protocol bugs you'd want to see in testing.
Save a WebSocket request
To save the current WebSocket request to a collection, press Ctrl+S (or Cmd+S on macOS). Enter a name when prompted and pick the collection to save it under.
Saved WebSocket requests appear in your collection sidebar with a green ws label so you can tell them apart from REST and GraphQL requests at a glance.
Run a folder or collection that contains WebSocket requests
WebSocket requests are automatically excluded when you run an entire folder or collection that mixes WebSocket and HTTP requests. The collection runner runs only the HTTP/GraphQL requests and skips the WebSocket entries silently.
This is intentional: WebSocket connections are long-lived and stateful, while collection runs are sequential and stateless. Forcing them into the same flow would either block the run on every WebSocket or produce misleading results.
Coming soon
WebSocket request execution from the CLI (postmate run …) is on the roadmap. There's no separate ETA yet — follow the GitHub repo for release notes.
Common use cases
WebSocket testing in Postmate Client is useful for:
- Chat and messaging APIs — test live message delivery, presence, and typing indicators.
- Stock tickers and market data feeds — verify subscription messages and streamed price updates.
- IoT and device telemetry — confirm device check-ins and command responses.
- Real-time dashboards and notifications — validate push events and event ordering.
- GraphQL subscriptions — connect to a GraphQL-over-WebSocket endpoint and watch subscription data stream in.
- Game backends and multiplayer servers — exercise lobby joins, state syncs, and matchmaking events.
How Postmate Client compares for WebSocket support
| Postmate Client | Postman | Thunder Client | |
|---|---|---|---|
| WebSocket support | ✅ Free | ⚠️ Yes (login required) | 💰 Paid tier only |
| Runs inside VS Code | ✅ Native | ❌ Desktop app | ✅ Native |
| Works offline | ✅ Always | ⚠️ Limited | ⚠️ Limited |
| Save to collections | ✅ Yes | ✅ Yes | ✅ Yes |
| Per-message format validation | ✅ TEXT / JSON / XML / HTML | ⚠️ Limited | ⚠️ Limited |
| Streaming response view | ✅ Yes | ✅ Yes | ✅ Yes |
| No telemetry | ✅ None | ❌ Yes | ❌ Yes |
| Price | ✅ Free forever | 💰 Paid plans | 💰 Paid tier |
Feedback and feature requests
WebSocket support is a new feature and we want to hear how you're using it. Open an issue or feature request on GitHub or jump into the discussion forum.