How to Import from Swagger in Postmate Client (Step-by-Step Guide)
Manually creating API requests from Swagger files can be slow and error-prone. Learn how to import a Swagger or OpenAPI spec into PMC instantly.
Postmate Client (PMC) is a lightweight Postman alternative for VS Code.
You can generate a fully structured, parameterized API collection right inside your editor in seconds — no manual request creation or copy-pasting URLs. Just point PMC at your spec and click generate.
This guide walks you through the complete process, step by step.
You can also migrate from Postman collections if you're switching tools.
What Is "Import from Swagger" in Postmate Client?
Import from Swagger is a built-in feature in Postmate Client that reads a Swagger 2.0 or OpenAPI 3.x specification (JSON or YAML) and automatically creates:
- A named collection of API requests organized by resource/tag
- Parameterized endpoints using environment variables
- An auto-populated data table with all extracted variables
This saves developers hours of manual collection setup and is especially useful when onboarding to a new API, generating a full test suite, or keeping your collection in sync with an evolving spec.
Prerequisites
- Postmate Client extension installed in VS Code
- A valid Swagger 2.0 or OpenAPI 3.x spec URL (or local file)
Step 1: Open the "From Swagger..." Option in Postmate Client
In the Postmate Client sidebar, locate the New Request button at the top. Click the dropdown arrow (▾) on the right side of the button to expand the options menu.
Select "From Swagger..." from the list.
 The New Request dropdown in Postmate Client's sidebar — select "From Swagger..." to begin.
Other options in this menu:
- From cURL...
- From Swagger... ← this one
- From Postman OR postmate...
🎥 Video Walkthrough
Watch how to import a Swagger / OpenAPI spec into Postmate Client.
Step 2: Configure the Import from Swagger Form
The Import From Swagger panel opens. Fill in these four fields:
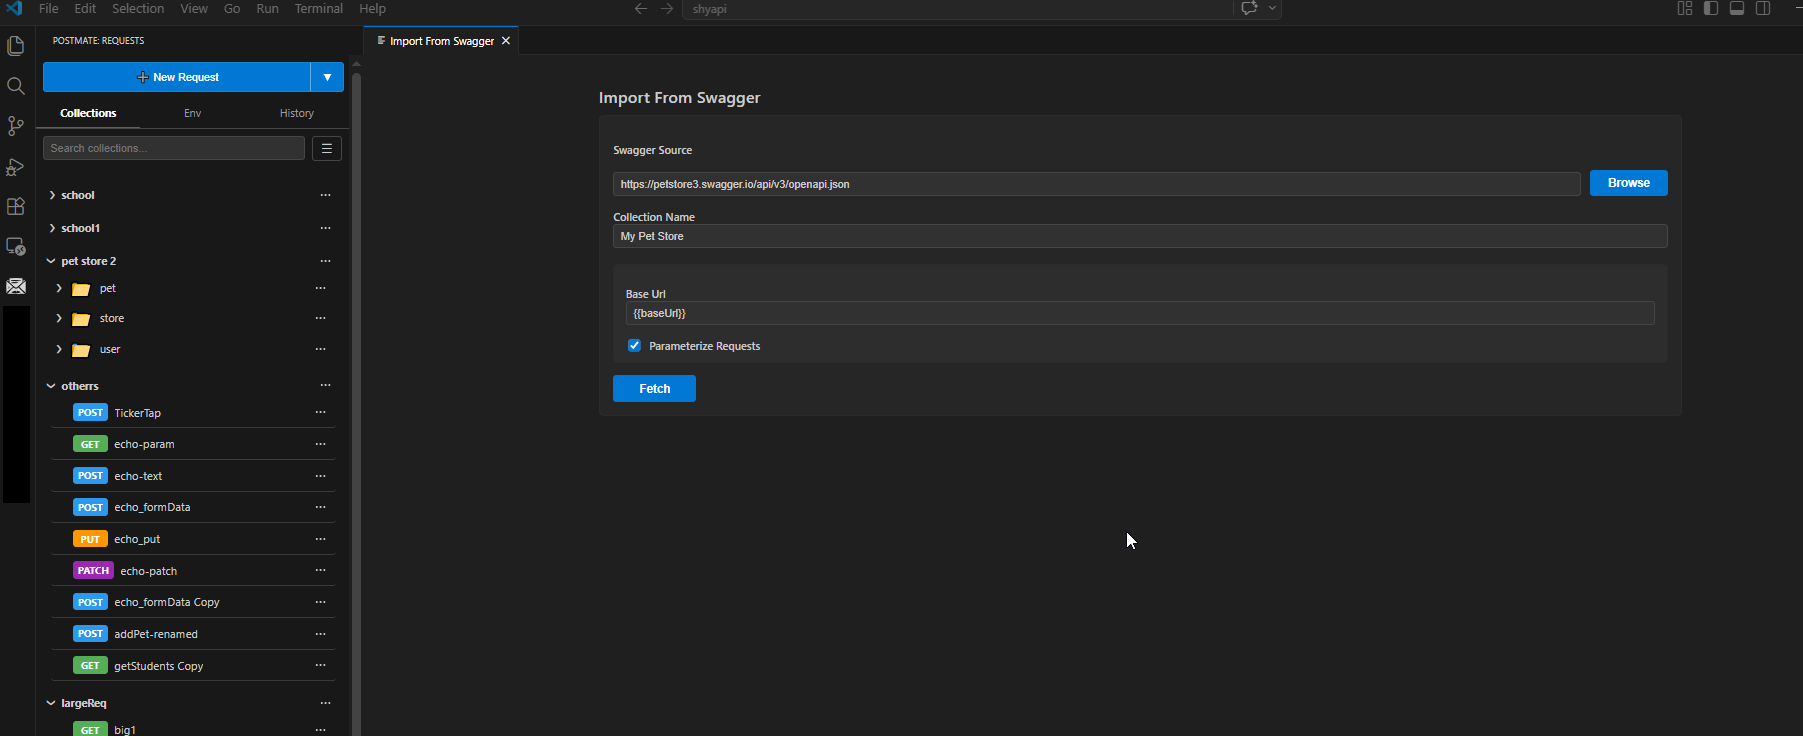 The Import From Swagger form in Postmate Client.
Swagger Source URL
Enter the URL to your OpenAPI or Swagger spec, or click Browse to select a local .json or .yaml file.
Example:
https://petstore3.swagger.io/api/v3/openapi.jsonWorks with any publicly accessible OpenAPI 3.x or Swagger 2.0 spec URL.
Collection Name
Give your new collection a meaningful name. This will appear in the PMC sidebar.
Example:
My Pet StoreBase URL
Enter a variable name for the base URL (e.g., {{baseUrl}}), or leave this field blank. Postmate Client will automatically detect the server URL from the spec and insert it for you.
Example:
{{baseUrl}}Parameterize Requests
This checkbox controls how path and query parameters are handled:
| Setting | Behavior | Best For |
|---|---|---|
| ✅ Checked | Creates one request per endpoint with parameters as variables | Reusable collections, team workflows |
| ☐ Unchecked | Creates multiple requests per endpoint with hardcoded parameter values | Quick one-off testing |
Recommended: Keep this checked. Parameterized collections are cleaner, more maintainable, and easier to share across environments.
Step 3: Fetch the Spec and Select Requests to Import
Click the Fetch button.
Postmate Client will parse your Swagger/OpenAPI spec and display a "Select Requests to Import" panel on the right, listing every discovered API endpoint.
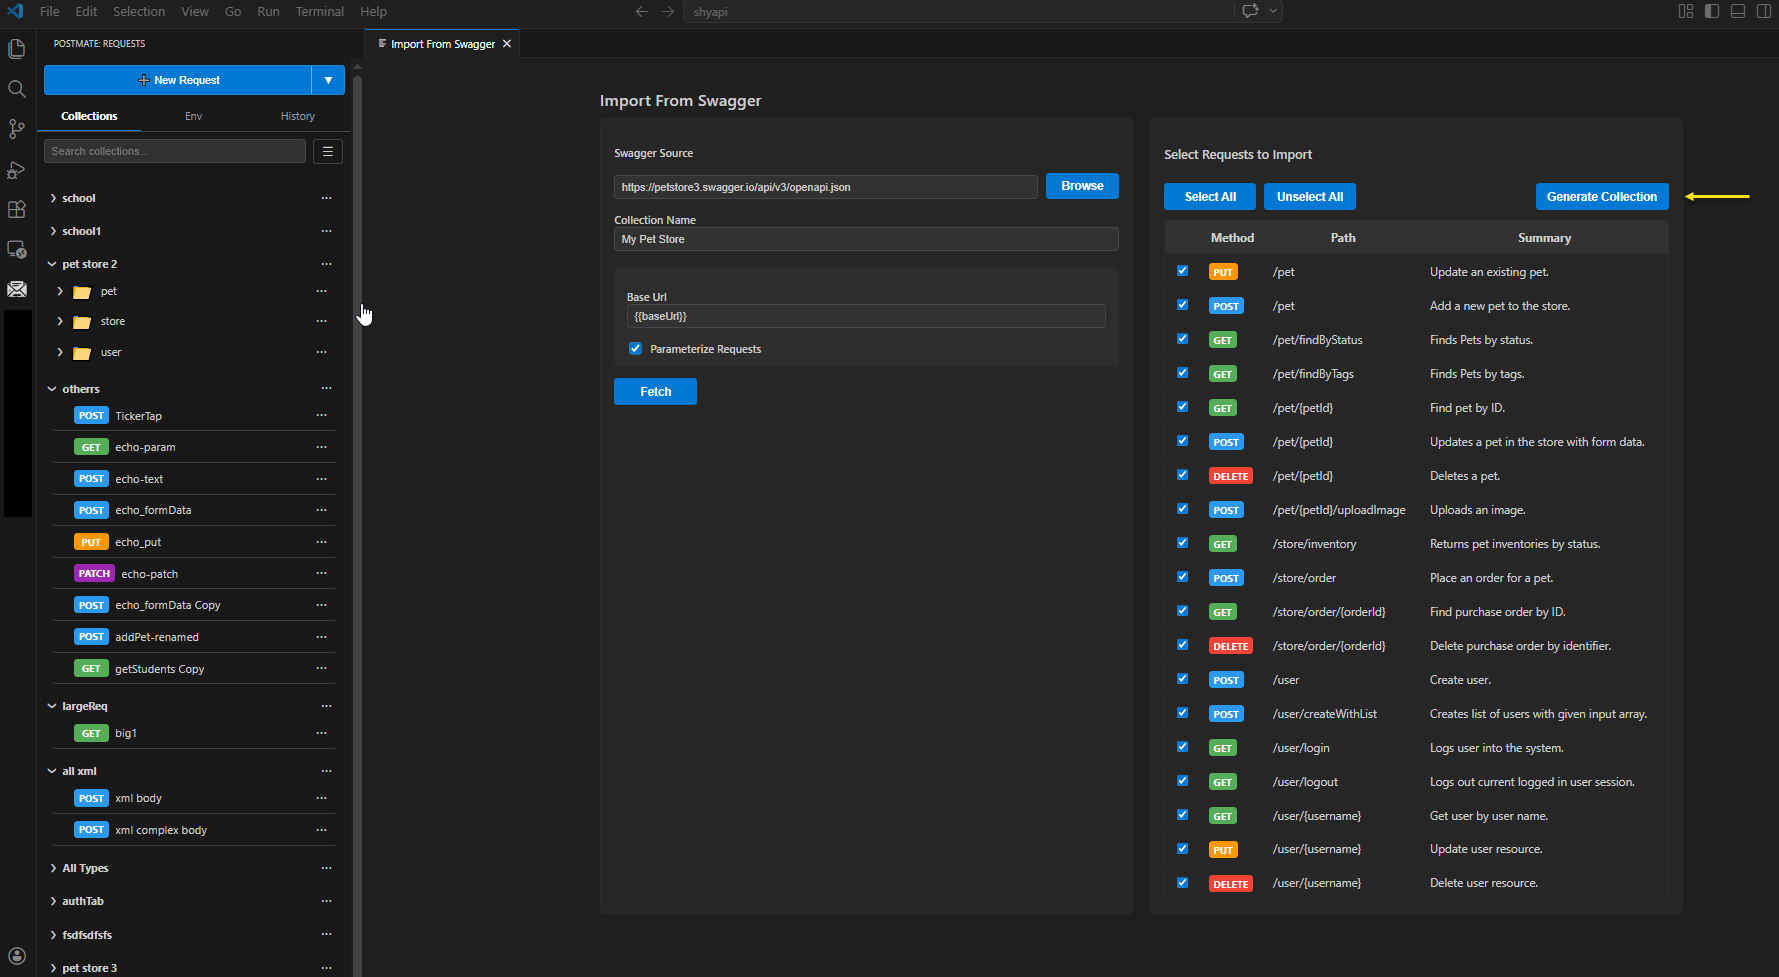 PMC automatically fetches and lists all endpoints from the spec — ready to select.
Each row in the list shows:
- Method — GET, POST, PUT, DELETE, PATCH
- Path — e.g.,
/pet,/store/order/{orderId} - Summary — a human-readable description pulled from the spec
Select Which Requests to Import
Use the controls at the top of the list:
| Button | Action |
|---|---|
| Select All | Import every endpoint |
| Unselect All | Start with a clean slate |
| Individual checkboxes | Import only specific endpoints |
Tip: Select all to generate a complete API test suite in one click, or cherry-pick only the endpoints relevant to your current feature or sprint.
Step 4: Generate the Collection
Click Generate Collection.
Postmate Client will create a fully structured, parameterized API collection in your sidebar — organized into folders that mirror the tag groups in your spec.
 The generated collection — organized, parameterized, and ready to use.
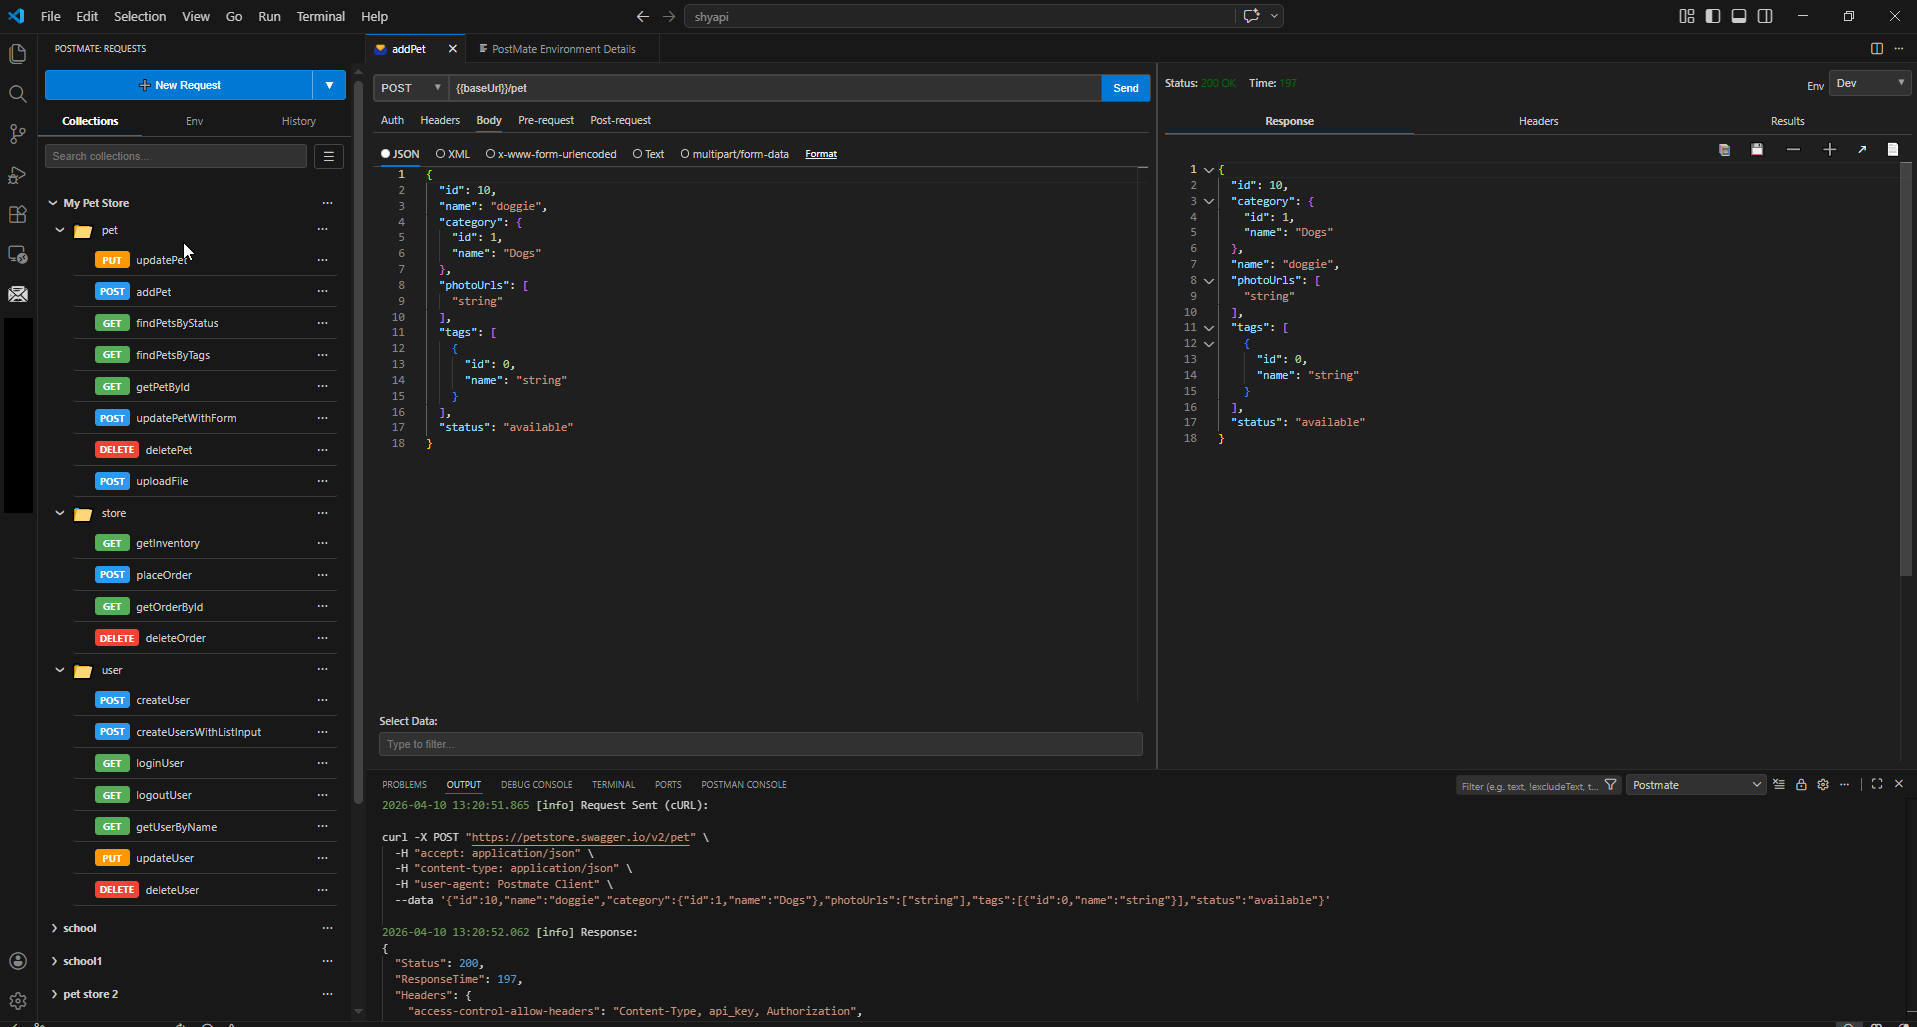
The Result: A Fully Parameterized API Collection
After generating, you'll have:
✅ A well-structured collection organized by resource (e.g., pet, store, user)
✅ Fully parameterized requests — no hardcoded base URLs or IDs
✅ An auto-generated data table with all variables pre-populated
You can immediately update the data table with your real values — base URL, auth tokens, test IDs — and your entire project is ready to run.
Unlike Postman, Postmate Client (PMC) generates parameterized collections directly from Swagger without requiring cloud sync or external accounts.
Example collection structure (Petstore spec):
My Pet Store/
├── pet/
│   ├── PUT  updatePet
│   ├── POST addPet
│   ├── GET  findPetsByStatus
│   ├── GET  findPetsByTags
│   ├── GET  getPetById
│   ├── POST updatePetWithForm
│   ├── DEL  deletePet
│   └── POST uploadFile
├── store/
│   ├── GET  getInventory
│   ├── POST placeOrder
│   ├── GET  getOrderById
│   └── DEL  deleteOrder
└── user/
    ├── POST createUser
    ├── POST createUsersWithListInput
    ├── GET  loginUser
    ├── GET  logoutUser
    ├── GET  getUserByName
    ├── PUT  updateUser
    └── DEL  deleteUser
Quick Reference Summary
| Step | What to Do |
|---|---|
| 1 | Click New Request ▾ → From Swagger... |
| 2 | Paste your Swagger/OpenAPI spec URL (or Browse for a local file) |
| 3 | Set a Collection Name and Base URL variable |
| 4 | Enable Parameterize Requests (recommended) |
| 5 | Click Fetch to load all endpoints |
| 6 | Select the requests you want to import |
| 7 | Click Generate Collection |
Common use cases:
- Onboarding to a new API quickly
- Generating API test collections
- Keeping collections in sync with backend changes
Frequently Asked Questions
What file formats does Postmate Client support for Swagger import?
Postmate Client supports both JSON and YAML formats for OpenAPI 3.x and Swagger 2.0 specs. You can provide a remote URL or browse to a local file on your machine.
What is the difference between Parameterize Requests checked vs unchecked?
When checked, PMC creates one request per endpoint where path and query parameters are replaced with named variables (e.g., {{petId}}). When unchecked, it generates separate requests for the same endpoint with hardcoded values. Parameterized requests are generally preferred for reusable, team-friendly collections.
Can I import only some endpoints from a Swagger spec?
Yes. After clicking Fetch, you can use the individual checkboxes in the "Select Requests to Import" panel to choose exactly which endpoints to include. Use Unselect All first to start from scratch, then check only the ones you need.
Does Postmate Client automatically detect the base URL from the spec?
Yes. If you leave the Base URL field blank, Postmate Client reads the servers array (OpenAPI 3.x) or host/basePath fields (Swagger 2.0) from the spec and inserts the URL automatically.
Is Postmate Client the same as Postman?
No. Postmate Client is a VS Code extension that provides API testing features similar to Postman, but directly inside your editor. It supports importing from Swagger, cURL, and Postman collection formats.
Share Your Feedback
Tried the Import from Swagger feature? We'd love to hear what you think.