OAuth 2.0 Testing is Live in Postmate Client
TL;DR: Postmate Client now supports full OAuth 2.0 — Client Credentials, Password, and Authorization Code with PKCE — alongside Basic, Bearer, API Key, and AWS Signature. Postmate fetches your token automatically on send, caches it, refreshes it silently, and never writes it to disk. It works in the request panel, the Collection Runner, and the CLI — free forever, no login, no telemetry. Install or update from the VS Code Marketplace →
Why this matters
OAuth 2.0 is the one part of API testing everyone hits and nobody enjoys. If your API sits behind a token endpoint, you've probably been doing some version of this:
- Fetch a token in one tool, paste it into another. Run a
curlto the token endpoint, copy theaccess_token, paste it into aBearerheader — then repeat every hour when it expires. - Pay for Postman. Its OAuth flow works, but it comes with an account requirement, cloud sync on by default, and telemetry in the background.
- Hand-roll a login script. Fine until you need to test the actual request, in the actual editor, next to the rest of your API tests.
Today we're shipping the option that should have existed all along: OAuth 2.0 as a first-class feature in Postmate Client — the token handling done for you, in the same editor you write your code in, entirely on your machine.
What you can do today
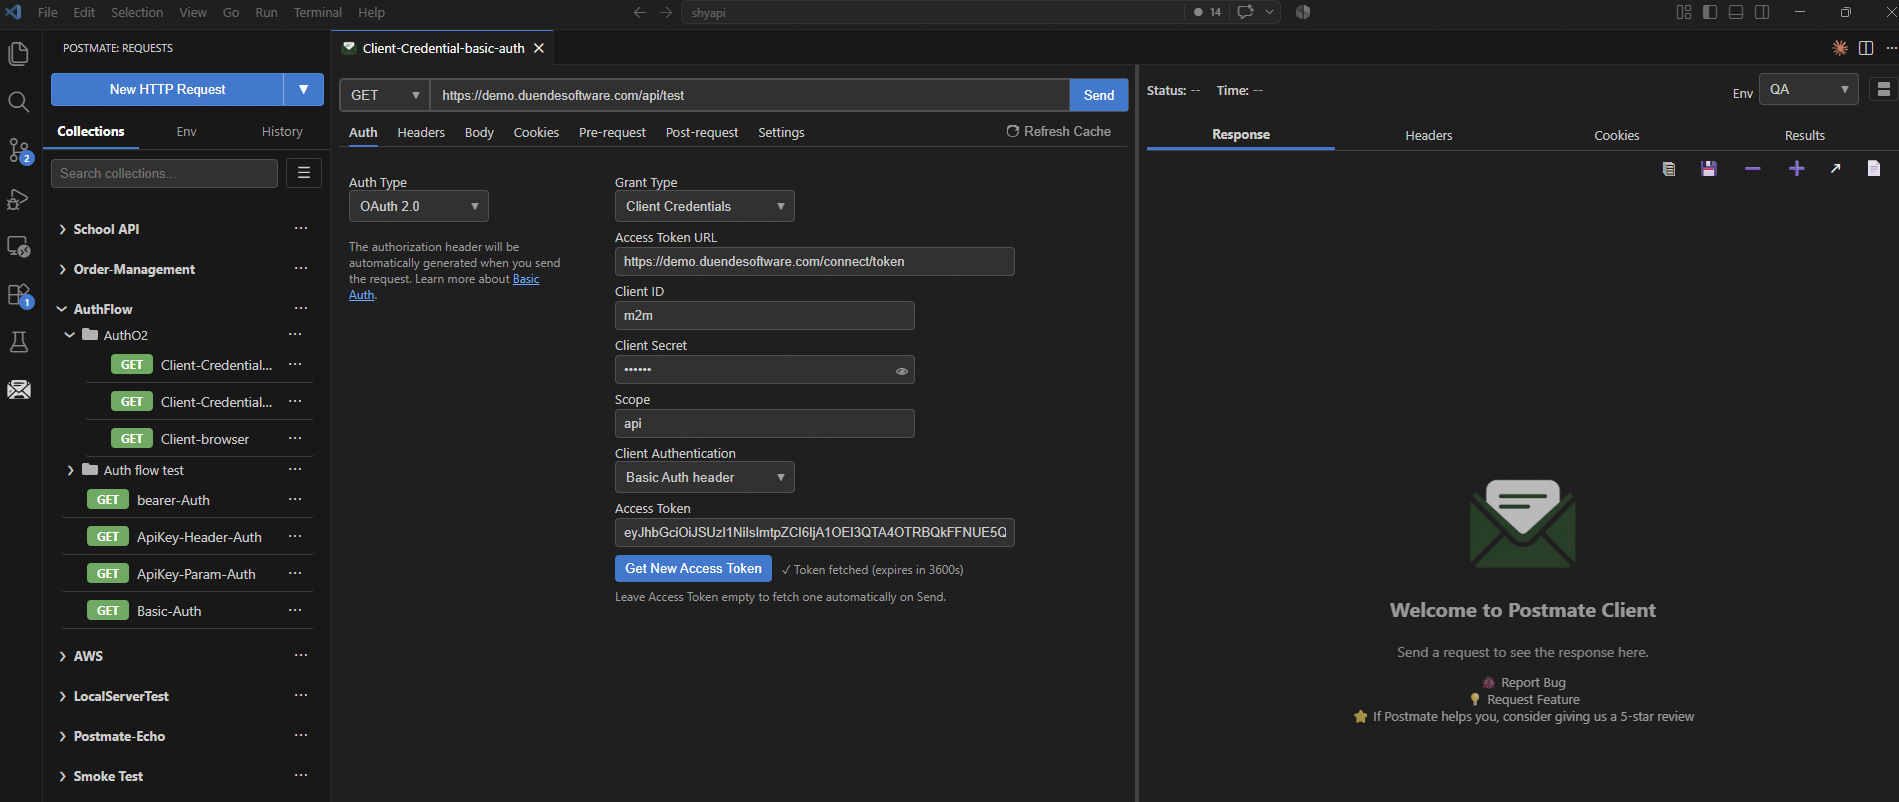
Open the Auth tab on any request, choose OAuth 2.0, and pick a grant:
- Client Credentials — machine-to-machine auth. Fill in the token URL, client ID, and secret; Postmate exchanges them for a token on send.
- Password Credentials — swap a username and password for a token.
- Authorization Code (PKCE) — the interactive, user-context flow. Postmate opens your default browser, you log in and approve, and the token comes back automatically. No copy-pasting codes out of a URL bar.
On top of the grant, you get:
- Automatic token fetch on send. Leave the Access Token field empty and Postmate fetches one the first time you send — then caches and reuses it until just before it expires. No hammering the token endpoint.
- Silent refresh. If the provider issues a refresh token, Postmate renews the access token in the background when it expires. With the browser flow, the browser only opens on the first login.
- Get New Access Token button — fetch a token manually and inspect it before sending.
- Client authentication your way — send client credentials as an
Authorization: Basicheader (client_secret_basic) or in the request body (client_secret_post). Public/PKCE clients with no secret are handled correctly too.
Full field-by-field reference: Authentication in Postmate Client →
How the browser flow works
The Authorization Code grant is the one people dread. Here's the whole thing:
- Click Get New Access Token. Postmate starts a temporary local server and opens the provider's login page in your default browser.
- You log in and approve access. Postmate uses PKCE (S256) and a
statecheck under the hood. - The provider redirects back to
http://127.0.0.1:<port>/callback, Postmate captures the authorization code, and the browser shows "Authentication complete." - Postmate exchanges the code for a token — and a refresh token, if you asked for one — and fills it in.
Because the token logic lives in Postmate's core engine, the same auth works everywhere: the request panel, collection runs, pre-requests, and the CLI for CI/CD.
A few honest notes
- Tokens never touch your disk. Access and refresh tokens live in memory only. Saving a request writes the OAuth configuration to your collection file — never the token. Keep the client secret out of files too by referencing a secret variable, stored in your OS keychain.
- An explicit header still wins. If you set an
Authorizationheader yourself in the Headers tab, it overrides the Auth tab for that request. - The Authorization Code grant needs one interactive login. A browser login can't happen mid-run, so the Collection Runner and CLI reuse the cached token and refresh it silently — run Get New Access Token once in the panel first. Client Credentials and Password grants need no interaction and run unattended, which makes them the right fit for CI.
- The browser flow uses loopback redirects. It works with providers that allow a
http://127.0.0.1:<port>/callbackredirect URI — which is most standard OAuth 2.0 providers. Just register that URI in your app.
How to try it
- Install Postmate Client (or update if you already have it) from the VS Code Marketplace.
- Open or create a request and click the Auth tab.
- Choose OAuth 2.0, pick a grant type, and fill in your provider's details.
- Leave Access Token empty and hit Send — Postmate fetches the token and makes the call. Or click Get New Access Token to grab one first.
Full walkthrough: Authentication → · Keep secrets safe: Secret Variables →
Feedback wanted
OAuth 2.0 support is new and we want to know how you're using it — which providers, which grants, what's missing.
- Open an issue or feature request on GitHub
- Join the conversation in the discussion forum
If you've been waiting for a free, local, VS Code-native way to test OAuth 2.0 APIs — it's here. Happy testing.