Pre and Post-Request Scripts in VS Code: A Complete Guide to API Test Automation
May 25, 2026 · 12 min read
If you've ever written a Postman test script, you know the drill. You hit "Tests," you stare at a small text box, you start typing pm.test(...), you forget whether it's pm.response.json() or pm.response.body(), and there's no autocomplete to save you. You alt-tab to the Postman docs. You copy a snippet, paste it back, and tweak. The test runs. Half the time it fails because you mistyped a JSON field name that you can clearly see in the response panel two inches away.
This post is about doing all of that — pre-request scripts, post-request scripts, pm.test, pm.expect, environment variables, JSON schema validation — inside VS Code, with the smartest scripting experience in any API client on the market today.
Postmate Client supports the full Postman pm library. Your existing Postman scripts run as-is. But what makes scripting in Postmate Client actually pleasant — what makes it better than Postman, not just equivalent — is something none of the other tools do: the script editor knows about your last response. You hit Send, you get a response back, and the next time you type RESPONSE.body. in your test script, every field from that response shows up as an autocomplete suggestion. No more squinting at the response panel to copy field names. No more typos.
This guide covers everything you need to write production-grade API test automation in VS Code: from your first pm.test to chained auth flows to JSON Schema validation. If you're migrating from Postman, skip to the migration section. If you're new to scripting, start at the top.
What Are Pre-Request and Post-Request Scripts?
API requests rarely exist in isolation. You usually need to do something before the request fires (generate a timestamp, sign a payload, fetch a fresh token) and check something after the response comes back (was the status right, is the data shape valid, did the response come back fast enough). That's what pre-request and post-request scripts are for.
A pre-request script runs immediately before the HTTP request is sent. Common uses:
- Generate dynamic values (timestamps, UUIDs, request signatures)
- Fetch and inject an auth token from a previous response
- Conditionally modify headers or query parameters based on environment
- Log debug info about what's about to be sent
A post-request script runs immediately after the response is received. This is where the bulk of your work happens:
- Assert that the status code is what you expected
- Validate response body fields and shape
- Check that response time is under your performance budget
- Extract values (auth tokens, resource IDs) and save them to environment variables for the next request
- Run JSON Schema validation against the full response structure
Both types of scripts use the same pm API. Both have access to environment variables, the active request, and (in post-request scripts) the response. The difference is purely when they execute.
In Postmate Client, you'll find these tabs under any request: Pre-request and Post-request, each with its own Script sub-tab.
The pm Library: Postman-Compatible by Design
If you're coming from Postman, the most important sentence in this post is this: your scripts work as-is.
Postmate Client implements a Postman-compatible pm object. The same pm.test, pm.expect, pm.setVariable, pm.getVariable, and pm.schemaTest you already know. The same Chai-based assertion chain. The same global injection — no imports, no setup, the pm object is just there when your script runs.
Here's a real Postman test script:
pm.test('Status is 200', () => {
  pm.expect(pm.response.code).to.equal(200);
});

pm.test('Response has user object', () => {
  const body = pm.response.json();
  pm.expect(body).to.have.property('user');
});
In Postmate Client, the equivalent reads:
pm.test('Status is 200', () => {
  pm.expect(RESPONSE.status).to.equal(200);
});

pm.test('Response has user object', () => {
  pm.expect(RESPONSE.body).to.have.property('user');
});
The only meaningful difference: instead of pm.response.code and pm.response.json(), Postmate Client exposes a cleaner RESPONSE global with .status, .body (already parsed), .headers, and .responseTime. Everything else — pm.test, pm.expect, the assertion chain — is identical.
For most teams migrating from Postman, the script rewrite is a 5-minute find-and-replace, not a project.
The full pm API surface in Postmate Client:
| Method | Purpose |
|---|---|
pm.test(name, fn) | Register a named test |
pm.expect(value) | Chai assertion chain |
pm.assert(condition, msg?) | Boolean assertion |
pm.setVariable(key, value) | Write to active environment |
pm.getVariable(key) | Read from active environment |
pm.clearVariable(key) | Delete an environment variable |
pm.listVariables() | List all variable keys |
pm.getRequest() | Get the current request object |
pm.log(message) | Print to the output console |
pm.schemaTest(name, schema, data) | Validate against JSON Schema |
pm.base64Decode(str) | Decode a Base64 string |
For the full reference with examples, see the pm Library docs.
Writing Your First Script in 60 Seconds
Let's write a real test. We'll hit a GET /student endpoint that returns a school's roster, and we'll assert four things: status code, response time, that the school name matches what we expect, and that the students array isn't empty.
Step 1. Open any request in Postmate Client. Click the Post-request tab, then the Script sub-tab.
Step 2. Start typing. As soon as you type pm., Postmate Client's IntelliSense shows you every method on the pm object with inline documentation.
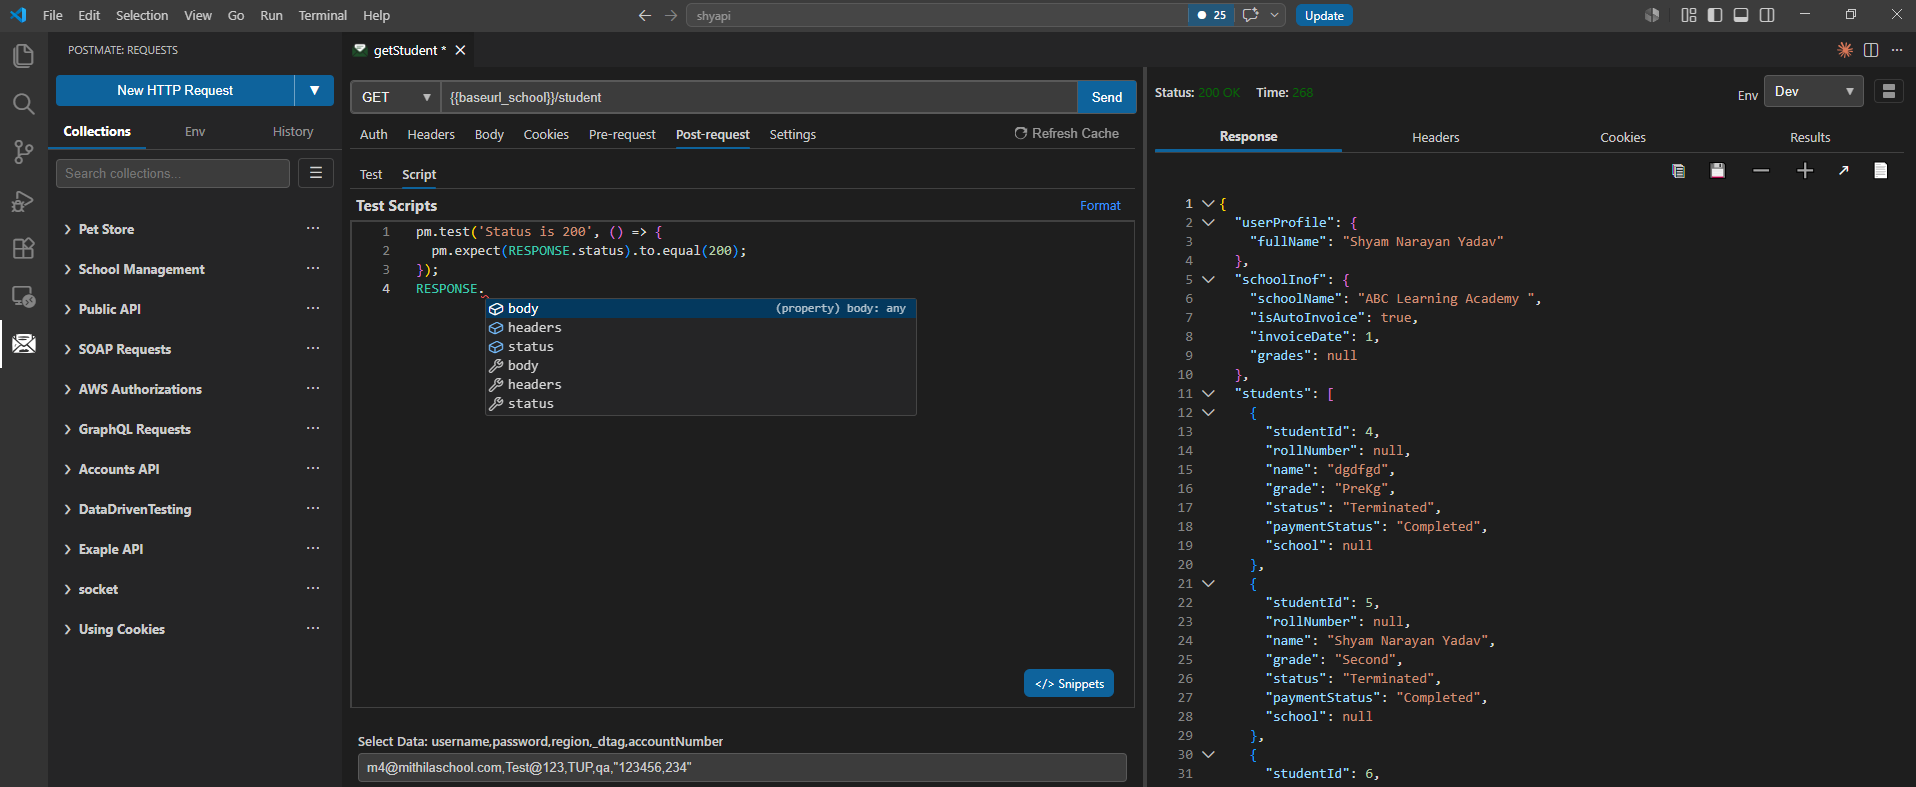
Step 3. Write four tests:
// 1. Status code
pm.test('Status is 200', () => {
  pm.expect(RESPONSE.status).to.equal(200);
});

// 2. Response time under 500ms
pm.test('Response is fast', () => {
  pm.expect(RESPONSE.responseTime).to.be.below(500);
});

// 3. School name matches
pm.test('School name is ABC Learning Academy', () => {
  pm.expect(RESPONSE.body.schoolInof.schoolName)
    .to.equal('ABC Learning Academy');
});

// 4. Students array has entries
pm.test('Students array is not empty', () => {
  pm.expect(RESPONSE.body.students).to.have.length.above(0);
});
Step 4. Hit Send. Switch to the Results tab in the response panel. You'll see four green checkmarks — or red Xs with clear failure messages if anything went wrong.
That's the entire loop. Write a test, hit Send, see results. No leaving VS Code, no clicking through three tabs in a separate app, no copying response bodies to a JSON path validator in a browser tab.
pm.test and pm.expect Explained
pm.test(name, fn) registers a named test. The name is what shows up in the results panel. The fn is a callback that runs the assertion — if it throws, the test fails; if it completes without throwing, the test passes. That's literally all there is to it.
pm.expect(value) returns a Chai assertion chain. Chai is the same assertion library Postman uses, so every matcher you've ever used in Postman works here. The most common ones:
| Matcher | What it does |
|---|---|
.to.equal(val) | Strict equality (===) |
.to.include(str) | String or array contains value |
.to.be.above(n) | Numeric greater than |
.to.be.below(n) | Numeric less than |
.to.have.length(n) | Exact array/string length |
.to.have.length.above(n) | Length greater than n |
.to.have.property(key) | Object has key |
.to.be.true / .to.be.false | Boolean check |
.to.be.a('string') | Type check |
If you don't need the chaining and just want a quick boolean check, pm.assert(condition, message) is a leaner alternative:
pm.assert(RESPONSE.status === 200, 'Expected status 200');
pm.assert(RESPONSE.body.token, 'Token must be present');
The Killer Feature: Response-Aware IntelliSense
This is the part that makes scripting in Postmate Client different from every other tool.
In Postman, Thunder Client, Bruno, Insomnia, and every other API client I've used, the script editor has no idea what your last response looked like. You can see the JSON in the response panel right next to you, but when you type pm.response.json(). in the script editor, you get nothing. No autocomplete. You have to read the field names off the response panel, type them by hand, and hope you spelled them right.
Postmate Client indexes your last response and pipes the field names into the script editor's autocomplete.
Run your request once. As soon as the response comes back, type RESPONSE.body. in your script. Every top-level field in the actual response shows up as an autocomplete suggestion. Pick one. Type the next dot. Get nested fields. Pick one. Keep going.
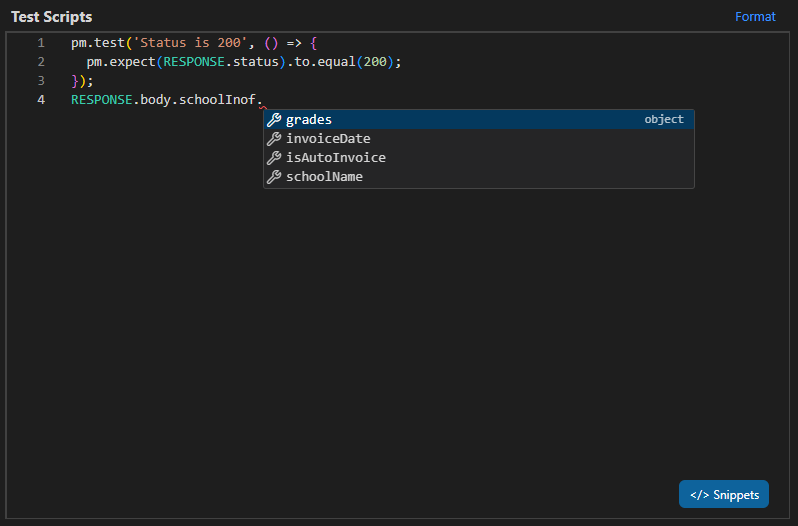
I've never seen this in another tool. Postman's scripts are isolated from the response panel. Thunder Client's scripts are isolated from the response panel. Bruno's scripts are isolated from the response panel. In Postmate Client, the script editor and the response panel are connected — your data shapes your tooling.
The practical impact:
- Zero typos in field names. You can't misspell a field that you're picking from a list.
- No alt-tabbing to inspect the response. The field structure is in the autocomplete.
- Faster onboarding to new APIs. You don't need to memorize a schema — explore it through the autocomplete as you write tests.
- Refactor-safe assertions. If the API changes a field name, your next response shows the new shape, and your autocomplete adjusts immediately.
This single feature is why I'd argue Postmate Client has the best scripting experience of any API client in 2026 — even ignoring the privacy story, the offline story, and the price.
The Snippet Library: 12+ Ready-Made Tests
Even with IntelliSense and response-aware autocomplete, sometimes you want to start from a known-good template. Click the </> Snippets button in the script editor and pick from a library of common tests.
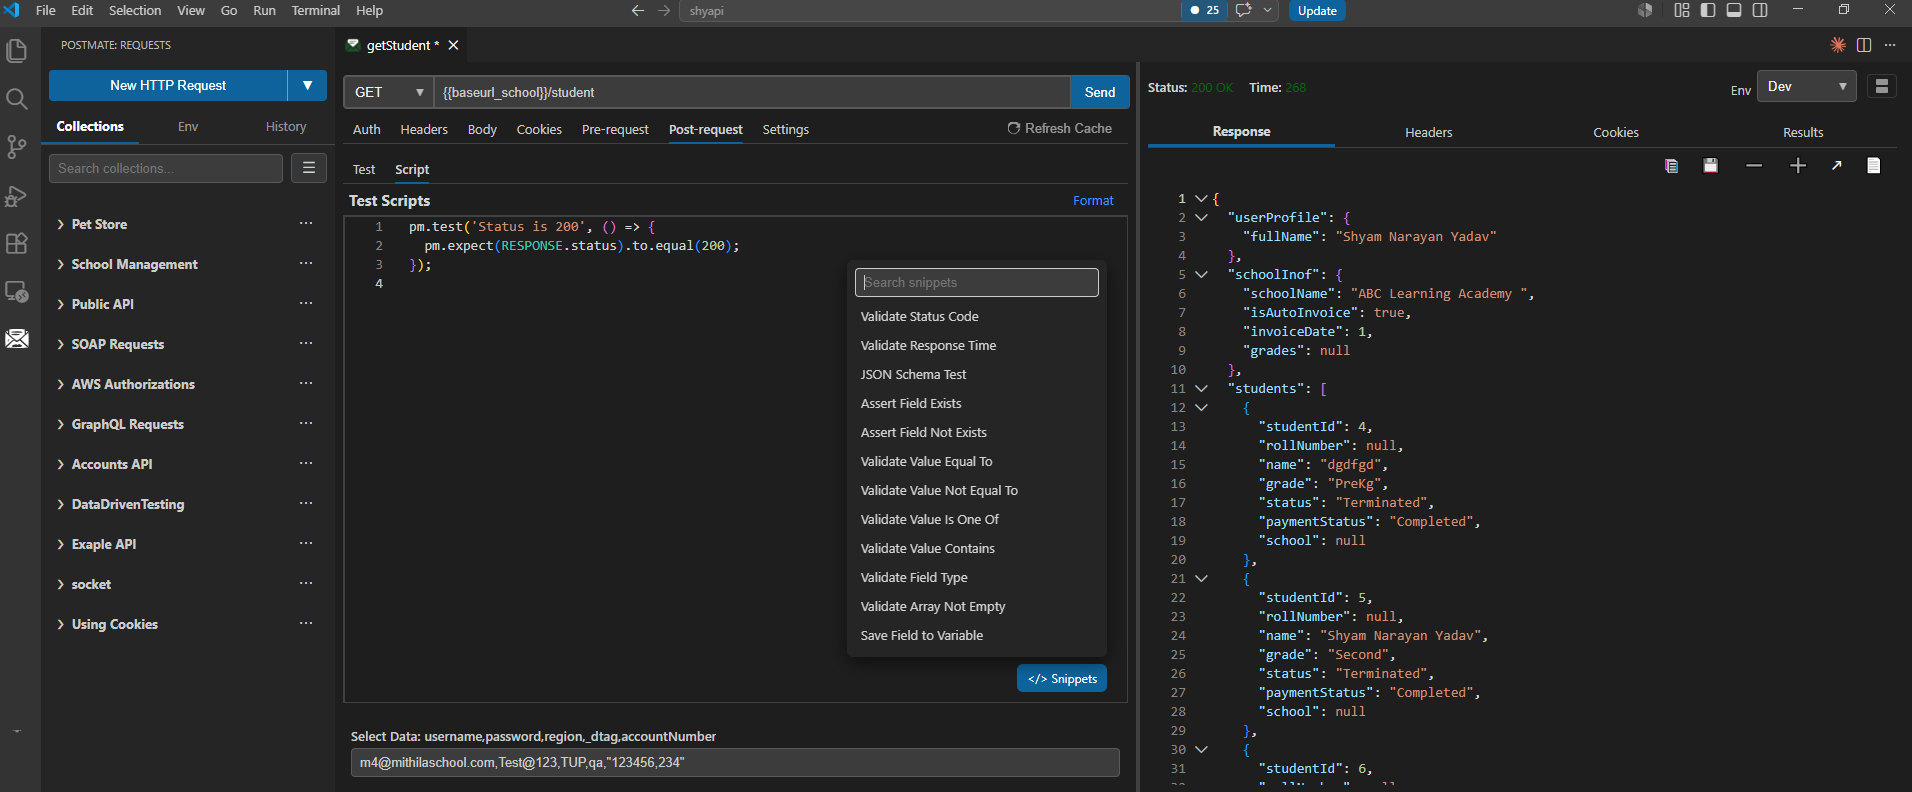
The snippets cover the patterns you'll write 80% of the time:
- Validate Status Code — assert the response code
- Validate Response Time — assert performance
- JSON Schema Test — validate the full response shape
- Assert Field Exists / Assert Field Not Exists — presence checks
- Validate Value Equal To / Not Equal To / Is One Of / Contains — value comparisons
- Validate Field Type — type checks
- Validate Array Not Empty — collection checks
- Save Field to Variable — extract for chaining
Each snippet inserts at the cursor with sensible defaults. Customize the field path, hit Send, done.
If you're new to scripting, the snippets are also the fastest way to learn the pm API — open one, see the pattern, then modify it.
Real-World Patterns
The basics are easy. Here's where scripting earns its keep — the patterns you'll reach for in real test suites.
1. Capture an Auth Token and Reuse It
The single most common scripting pattern. Your first request authenticates and returns a token. Every request after that needs to send the token in a header. Without scripting, you copy-paste tokens. With scripting:
On the login request, post-request script:
pm.test('Login succeeded', () => {
  pm.expect(RESPONSE.status).to.equal(200);
  pm.expect(RESPONSE.body.token).to.be.a('string');
});

// Save the token to the active environment
pm.setVariable('authToken', RESPONSE.body.token);
pm.setVariable('userId', RESPONSE.body.user.id);
On every downstream request, set the header:
Authorization: Bearer {{authToken}}That's it. Run login once, every subsequent request in your collection picks up the token automatically. Variables persist for the active session, so you can run a full collection top-to-bottom and tokens flow through.
For more on this pattern, see the Request Chaining guide.
2. Validate the Full Response Shape with JSON Schema
Field-by-field assertions don't scale. If your endpoint returns a user object with 15 fields, you don't want 15 separate pm.expect calls. Use pm.schemaTest to validate the entire shape in one call:
const userSchema = {
  type: 'object',
  required: ['id', 'email', 'createdAt', 'roles'],
  properties: {
    id:        { type: 'number' },
    email:     { type: 'string', format: 'email' },
    createdAt: { type: 'string' },
    roles:     {
      type: 'array',
      items: { type: 'string', enum: ['admin', 'user', 'guest'] }
    }
  }
};

pm.schemaTest('User response matches schema', userSchema, RESPONSE.body);
If any field is missing, has the wrong type, or doesn't match the enum, the test fails with a clear message pointing to the bad field.
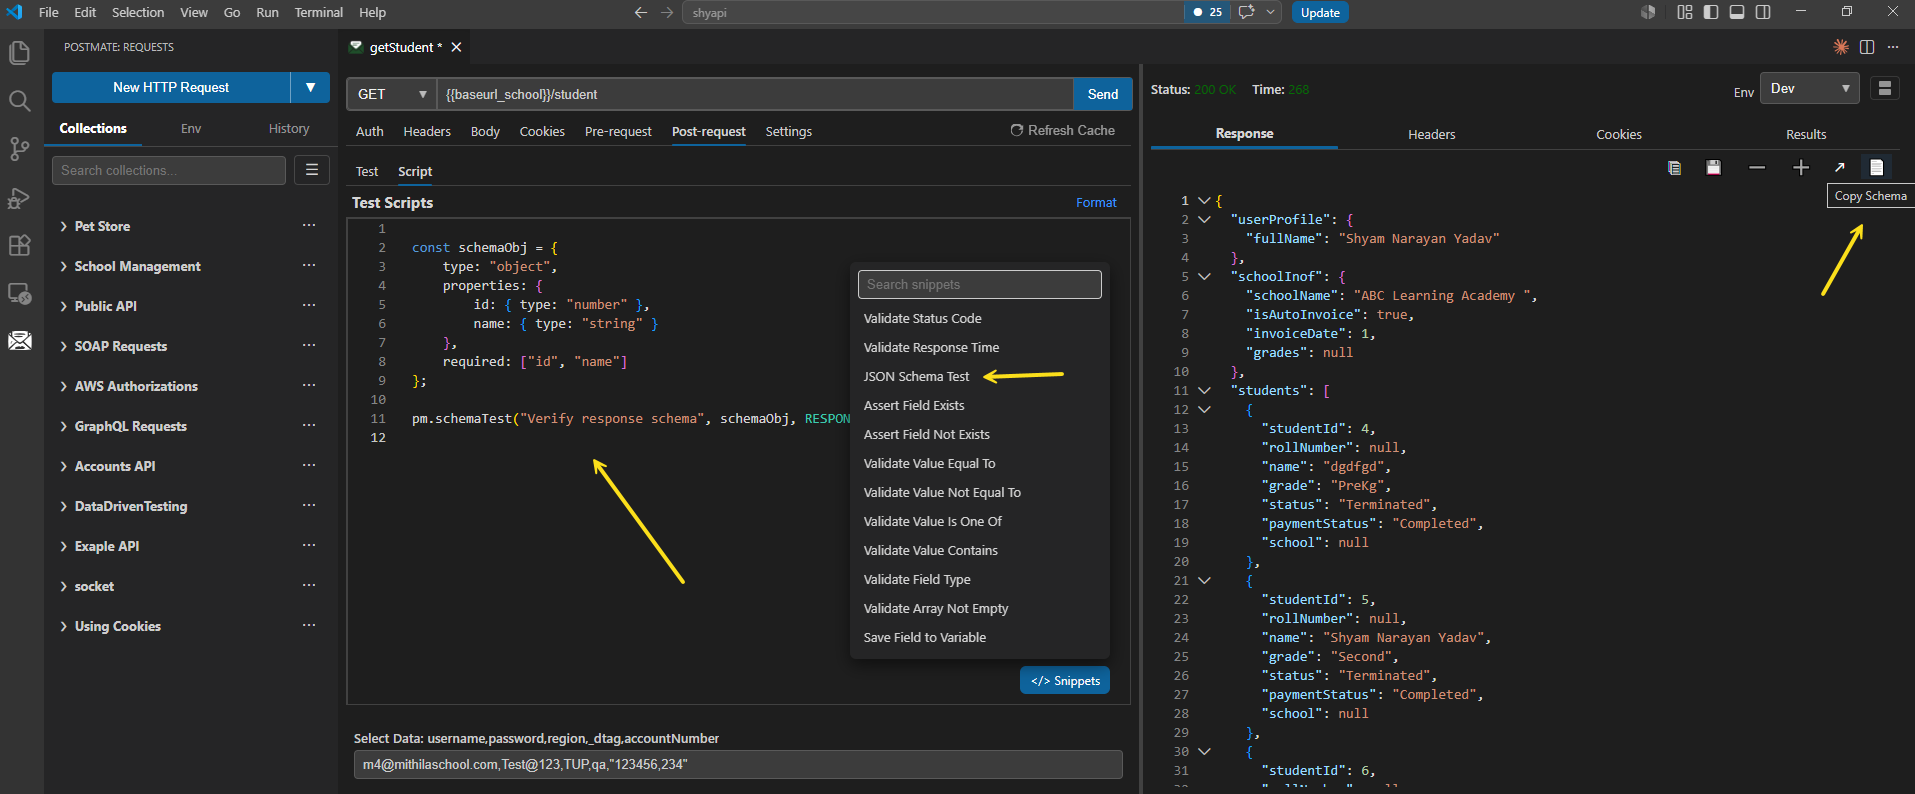
Don't want to write the schema by hand? Postmate Client has a one-click Generate Schema button. Run your request, click the button, paste the generated schema into your script, and tweak as needed. No external JSON-to-schema tools, no browser tabs.
3. Conditional Tests Based on Environment
Sometimes a test should only run in certain environments. Maybe you only want to assert specific schools exist in dev:
const env = pm.getVariable('ENV_NAME');

if (env === 'dev') {
  pm.test('Dev environment has test school', () => {
    const names = RESPONSE.body.schools.map(s => s.schoolName);
    pm.expect(names).to.include('ABC Learning Academy');
  });
}

// This test runs in all environments
pm.test('At least one school is returned', () => {
  pm.expect(RESPONSE.body.schools).to.have.length.above(0);
});
This pattern is invaluable when you're running the same collection against dev, staging, and prod with different data shapes.
4. Decode and Validate a JWT
You got back an access token. You want to sanity-check that it's actually a well-formed JWT with the right claims. pm.base64Decode makes this a two-liner:
const token = RESPONSE.body.accessToken;
const payload = JSON.parse(pm.base64Decode(token.split('.')[1]));

pm.test('JWT has correct issuer', () => {
  pm.expect(payload.iss).to.equal('https://auth.example.com');
});

pm.test('JWT not yet expired', () => {
  const now = Math.floor(Date.now() / 1000);
  pm.expect(payload.exp).to.be.above(now);
});

pm.log('JWT subject: ' + payload.sub);
5. Pre-Request: Generate a Dynamic Timestamp
Some APIs reject requests with stale timestamps to prevent replay attacks. Generate a fresh one in the pre-request script:
const now = Math.floor(Date.now() / 1000);
pm.setVariable('timestamp', String(now));
Then reference {{timestamp}} in your headers or body. Every time you hit Send, the timestamp regenerates.
6. Data-Driven Assertions Across CSV Rows
This is where Postmate Client really separates from the pack. Attach a CSV data table to your environment, and your script runs once per row. Inside the script, the current row's values are available as variables. This means you can write tests that adapt to each input row:
const expectedStatus = pm.getVariable('expectedStatus');

pm.test('Status matches expected for this row', () => {
  pm.expect(RESPONSE.status).to.equal(Number(expectedStatus));
});
Combine this with Data Tagging and you can run 500 input variations through a single test script with no loops, no boilerplate. This is a genuinely unique capability — no other VS Code API client offers it.
Postmate Client vs Postman vs Thunder Client: Scripting Compared
| Postmate Client | Postman | Thunder Client | |
|---|---|---|---|
| Runs inside VS Code | ✅ Native | ❌ Separate app | ✅ Native |
pm.test / pm.expect | ✅ Built-in | ✅ Built-in | ⚠️ Limited |
| Pre-request scripts | ✅ Full support | ✅ Full support | ⚠️ Limited |
| Post-request scripts | ✅ Full support | ✅ Full support | ⚠️ Limited |
| Chai assertion chain | ✅ Yes | ✅ Yes | ❌ No |
| JSON Schema validation | ✅ pm.schemaTest | ⚠️ Manual setup | ❌ Not available |
| One-click schema generator | ✅ Built-in | ❌ External tools | ❌ Not available |
| Snippet library | ✅ 12+ snippets | ✅ Yes | ⚠️ Few snippets |
| Response-aware IntelliSense | ✅ Unique | ❌ No | ❌ No |
pm method autocomplete | ✅ Full IntelliSense | ⚠️ Basic | ⚠️ Basic |
| Works offline | ✅ Always | ⚠️ Limited | ⚠️ Limited |
| Works without login | ✅ Always | ❌ Required | ⚠️ For paid features |
| CSV-driven script execution | ✅ Free | 💰 Paid (Newman) | ❌ Not available |
| Price | ✅ Free forever | 💰 Paid plans | 💰 Free + paid plans |
The response-aware IntelliSense row is the one that matters most in day-to-day work. The rest of the differences are real but incremental. That one feature changes how scripting feels.
Migration from Postman: A 5-Minute Process
If you have an existing Postman collection with scripts you want to bring over:
- Export your Postman collection as v2.1 JSON (Postman → Export → Collection v2.1).
- Import it into Postmate Client via the Collections panel. Your folders, requests, headers, auth, environments, and scripts all come across.
- Update the response references. In Postman scripts,
pm.response.codeandpm.response.json()becomeRESPONSE.statusandRESPONSE.body. Find-and-replace handles this in seconds. - Run a smoke test. Open a request, hit Send, check the Results tab. Most scripts work first try.
Full guide: Migrate from Postman.
The reason migration is so painless is that the pm API was designed to be a drop-in replacement, not a reinvention. Postman taught the industry how API testing scripts should look. Postmate Client keeps the API and improves the experience around it.
Best Practices for Pre/Post-Request Scripts
A few habits that pay off as your test suite grows:
1. Name your tests like assertions, not actions. Bad: pm.test('Check status', ...). Good: pm.test('Status is 200', ...). When you scan the results panel for failures, a descriptive name tells you what was supposed to be true.
2. One assertion per test. Don't pile five pm.expect calls inside a single pm.test. If the first one fails, you never see the others. Split them into separate pm.test blocks so each shows up independently in the results.
3. Use pm.log liberally during development. The output console is your friend. Log variable values, response shapes, intermediate computations. Remove the logs before committing if your team is strict about it; otherwise leave them — they're invaluable when a CI run fails three weeks from now and you need to retrace what the script saw.
4. Extract magic strings into variables. If you reference 'ABC Learning Academy' in five tests, set it as an environment variable and reference it as pm.getVariable('expectedSchoolName'). When the test data changes, you change one place.
5. Use JSON Schema for shape validation, pm.expect for value validation.pm.schemaTest is the right tool for "does this response have the right structure." pm.expect is the right tool for "is this specific value correct." Mixing them creates redundant tests.
6. Keep pre-request scripts short. Pre-request scripts run on every request. If yours does heavy work, every Send becomes slow. Most pre-request scripts should be 1-5 lines: generate a value, set a variable, done.
Running Scripts in CI/CD
Everything you write in the script editor runs the same way from the command line via the Postmate Client CLI. Your tests, your assertions, your variable chaining — all of it executes identically in a GitHub Actions workflow, a Jenkins pipeline, or a local cron job.
This means you can develop interactively inside VS Code with full IntelliSense and the response-aware autocomplete, then run the same collection headlessly in CI with no script changes. HTML and JSON reports come out the other side for your team.
The CLI is free. There's no paid tier. There's no per-seat license. Unlike Newman, which now requires a paid Postman seat to sync collections, Postmate Client's CLI reads collections directly from your local workspace — the same files you're editing.
FAQ
How do I write a pre-request script in VS Code?
Open any request in Postmate Client, click the Pre-request tab, then the Script sub-tab. Write JavaScript using the global pm object — for example, pm.setVariable('timestamp', Date.now()). The script runs immediately before the request is sent. Full IntelliSense and snippet support are available.
How do I write a post-request script in VS Code?
Open the request, click Post-request → Script, and write assertions using pm.test and pm.expect. Access the response via the RESPONSE global (RESPONSE.status, RESPONSE.body, RESPONSE.headers, RESPONSE.responseTime). Hit Send, then check the Results tab for pass/fail status.
Is the Postmate Client pm library the same as Postman's?
Yes — Postmate Client implements a Postman-compatible pm object including pm.test, pm.expect, pm.setVariable, pm.getVariable, pm.schemaTest, and pm.base64Decode. Most Postman scripts work as-is after a quick find-and-replace from pm.response.json() to RESPONSE.body.
Can I use pm.test and pm.expect in Postmate Client?
Yes. Both work identically to Postman. pm.test(name, fn) registers a named test and pm.expect(value) returns a Chai-based assertion chain with matchers like .to.equal, .to.include, .to.be.above, .to.have.property, and more.
Does Postmate Client have autocomplete for response fields?
Yes, and this is unique among API clients. After you run a request, Postmate Client indexes the response and surfaces every field as an autocomplete suggestion when you type RESPONSE.body. in your script. No other API client connects the response panel to the script editor this way.
Can I validate a JSON response against a schema?
Yes. Use pm.schemaTest(name, schema, data) to validate any value against a JSON Schema object. Postmate Client also has a one-click Generate Schema button that produces a schema from your live response — no external tools required.
Do my Postman scripts work in Postmate Client?
Yes, with minor adjustments. Replace pm.response.code with RESPONSE.status and pm.response.json() with RESPONSE.body. Everything else — pm.test, pm.expect, the Chai matchers, pm.setVariable/pm.getVariable — works identically.
Can pre-request and post-request scripts share variables?
Yes. Both run in the context of the active environment, so any variable set with pm.setVariable in a pre-request script is readable via pm.getVariable in the post-request script (and vice versa across requests in a collection).
Can I run scripts in CI/CD?
Yes. The Postmate Client CLI runs collections headlessly with full script execution and produces HTML/JSON reports. The CLI is free — no paid tier required, unlike Postman's Newman.
Try It
The fastest way to see the response-aware IntelliSense in action is to install the extension and run any existing request:
- Install Postmate Client from the VS Code Marketplace.
- Create a new request or import a Postman collection.
- Hit Send.
- Click Post-request → Script and type
RESPONSE.body.— watch the autocomplete populate with your actual response fields.
If you're moving an existing test suite from Postman, the Migrate from Postman guide walks through the full import flow.
Questions, missing features, or feedback? Open an issue on GitHub or start a discussion. Every request comes from a real developer's workflow — the response-aware IntelliSense exists because someone said "why can't the script editor see what the response panel sees?" and we built it.
Related reading:
- Tests & Assertions in VS Code — the docs page this post extends
- pm Library Reference — full API reference
- Request Chaining — patterns for passing data between requests
- CLI Reference — run your scripts headlessly in CI/CD
- Migrate from Postman — bring your existing collections across